This is fantastic if you are only using Wine to run a single program - however in the case you are running two or more programs under Wine it is not unheard of for each of the different programs you are running to perform better under different Wine versions (or with different patches). The solution to this issue is simple: install multiple versions of Wine on the same system and run each program with the version that it behaves best under.
Step 1 - Setup:
Download the source code tar.bz2 file for the additional Wine version you wish to install from Source Forge. Extract the contents of the tar.bz2 file to your preferred directory
Then we want to install all of the build dependencies we will need to compile Wine from source. On Ubuntu we can do this by running the following command in terminal sudo apt-get build-dep wine (You should check here for information on getting the Wine build dependencies on other distributions.)
Step 2 - Compiling Wine:
Open your favorite terminal and change directory to the location of your extracted Wine source. (If you wanted to apply a patch to your Wine source now is the time). Once you are ready we are going to configure and compile your Wine source. To do so we use the following command in terminal ./configure --prefix=/usr/local/bin/wine-someversion && make depend && make
At this point go make yourself a sandwich, watch some television, or better yet go read some other wonderful articles written by yours truly. (Seriously configuring & compiling Wine takes a fair bit of time depending on your hardware)
Step 3 - Installing Wine & Clean Up:
Alright, now that you have a full stomach we can install our newly compiled Wine code and setup the last few things we need. Install Wine with the following command sudo make install
Lastly we need to create our new wine, regedit, and winecfg commands. To create the wine-someversion command we use a symlink as such:
sudo ln -s /usr/local/bin/wine-someversion/bin/wine /usr/bin/wine-someversion
sudo ln -s /usr/local/bin/wine-someversion/bin/wine /usr/local/bin/wine-someversion/bin/wine-someversion
To setup up winecfg-someversion and regedit-someversion you have to do the following:
- Open your favorite text editor as super user (example: gksudo gedit)
- Enter the following as the only line: /usr/local/bin/wine-someversion/bin/winecfg
- Save the file to /usr/bin/winecfg-someversion
- Make the file executable with the following command: sudo chmod +x /usr/bin/winecfg-someversion
- Repeat the above four steps only replace winecfg with regedit
Lastly:
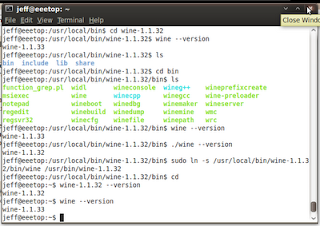
You can now use your different Wine install by running the Wine command with its following version number. In the attached image you can see I have my default Wine command (currently 1.1.33) and then I also have 1.1.32 installed which I access by running wine-1.1.32
You can install as many different Wine versions as you like in this manner. This way you can feel safe in installing a new Wine version and not have to worry about breaking support for your favorite Windows based application.
Cheers,
~Jeff Hoogland
Tidak ada komentar:
Posting Komentar